
With carousel ads you can feature more than one product or service (or blog post even) in sponsored News Feed without having to create multiple adverts.
Carousel ads allow you to upload multiple images (and even videos) in a single ad unit on either Facebook or Instagram. You can use them to show more products, but you could also use a succession of images to tell a story or provide more details and close-ups of your product.
Assets – what you need to have ready:
The specification for what you need is here in Facebook’s helpful Business Ads Guide. When you go to create your multiple product ad, you’ll need some text that goes at the top above all the images. You’ll also need 600×600 images plus headline and descriptive copy for each of your images/products. Facebook will try to pull the image, headline and description from the meta data on your page link, but remember that you can overwrite these. Do note that these product ad images are square so very different from the usual rectangular 1200×628 that you would normally be using for single image posts. I’ve used Canva to create my images below. You’ll also need to add in a “See More” URL which will appear at the end of your links/images. Facebook will auto pull the Page’s profile photo for that and you can’t override it. At the bottom you can provide URL tags and tracking pixels. If you’ve set your objective to Website Conversions, you’ll need to also set a Conversion Pixel.
Putting the ads together
Below you will see a screen grab of my work in progress in putting together a multiple product ad. In this instance, the “product” is a number of digital marketing training days (and yes, I’d love to have you there – we have some online options if you are not local to London or Manchester). If you’re familiar with Power Editor and creating ads already, it’s pretty straight forward.
- Create a new ad (I’m assuming you will have created a Campaign and Ad Set already)
- Select “Multiple images and links in one ad”
- Add in the text for the top of the ad
- Pop in your first image, a destination url, Headline for that image/product and Description for that image/product
- Click on image #2 and repeat.
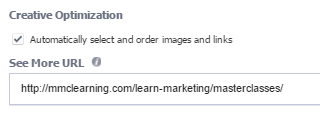
- Check “Creative Optimization” if you want Facebook to decide which images to show in which order
- Add in your “See More” url – maybe a home page or related product and a simpler “Display URL” if appropriate
- Add in URL tags, conversion and tracking pixels
- Upload
Below is a screen grab showing the process in action. 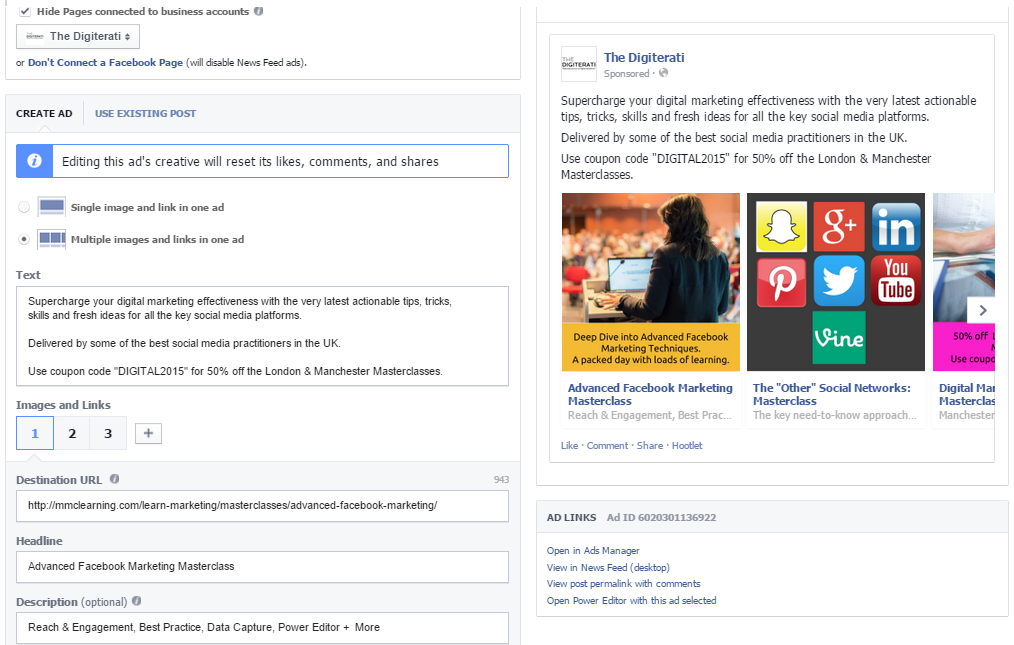
Want more help with Facebook ads?
Check out my brand new course ‘Zero to Hero with Facebook Ads‘ in the Digiterati Academy. You’ll fast track all my knowledge of what’s working to create great Facebook ads right now and feel confident in your ability to run an effective campaign.